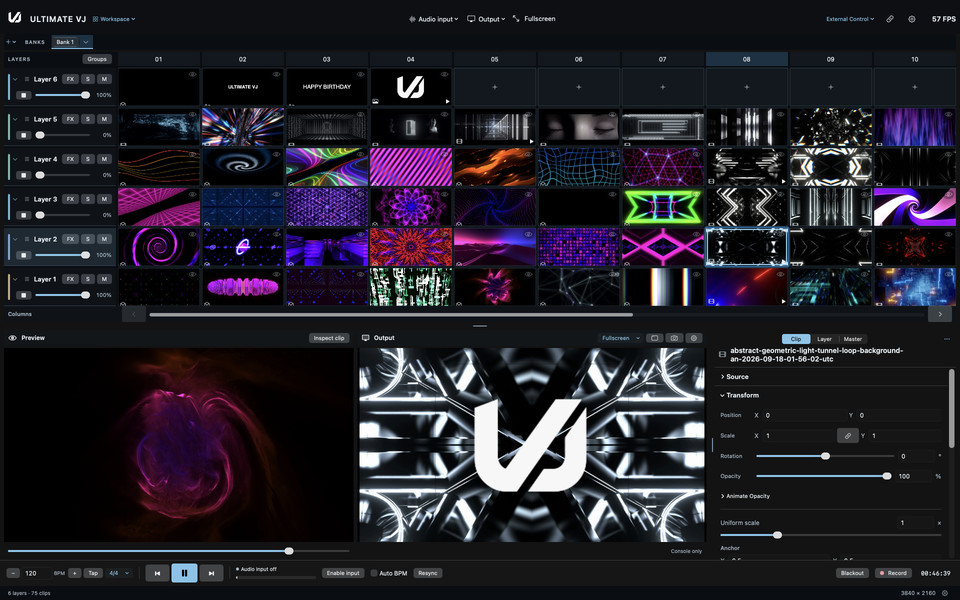
Make audio-reactive visuals in Ultimate VJ
Use live audio to move a visual parameter: choose a RenderWave shader, enable an audio input, then assign Bass, Mids or Highs in its Animate editor. You control the response amount and smoothing, and can save the result as a reusable look.
Published by Walz Media. Website editorial content.
This guide separates three tasks that can be easy to confuse: hearing a media file's soundtrack, estimating tempo, and using input audio to change the image. Start with Ultimate VJ installed on a supported Mac.
1. Start with a generated visual
Choose an empty clip slot, open Workspace → Shader browser, and search for a source you want to use. Choose Apply. That action inserts and triggers the shader in the browser's selected destination.
Open Clip → Source in the Inspector. Change one available shape, motion or color control while watching Output. Choose a parameter whose visible effect you can recognize before adding automation; the controls differ by shader.
The shader guide explains the Source controls and Looks menu. This exercise uses the Shader Browser built into Ultimate VJ.
2. Choose the audio the app should analyse
Open Settings → Audio → Audio input. Choose an available input device, then enable audio input. Grant macOS microphone permission when requested. A new show starts with input off; a saved show can restore its enabled input choice.
Watch the Input level meter and the status. Selecting a device does not start capture. If nothing arrives, check that the selected input receives the music, rather than assuming the Mac's playing soundtrack reaches it. This guide does not require installing an additional audio-routing product.
Disable input before changing the selected device. If the device disconnects, choose an available one and enable input again. See Audio analysis and tempo detection for the controls and status messages.
3. Bind a parameter to a frequency band
Return to a numeric shader control. Open Animate, choose Audio, then select Bass, Mids or Highs in the input spectrum. Choosing a band enables the new response; opening the editor alone does not enable capture or choose a band.
Begin with a small Amount, watch the image, and increase it until you have the range you want. Increase Smooth if the motion is too abrupt. Use More → When quiet to choose the value during valid silent input.
Unavailable input and silence have different behavior. Without available input, the parameter returns to its manual value; valid silence uses When quiet. The animation guide describes these states.
4. Combine audio response with a timed movement
Use a second parameter for a regular cycle. Choose Waveform, select a shape such as Sine or Triangle, choose Beats, and set the cycle length. For example, try a four-beat motion cycle alongside a modest bass response on a different control.
Set or tap the composition tempo for that beat clock. Ableton Link can share tempo and bar phase with peers; it does not synchronize transport start/stop. Audio response does not require Link or a successful BPM estimate.
If you enable Auto BPM, the app uses eligible estimates and yields to Link. Treat an audio BPM estimate as a suggestion to inspect, especially when half-time and double-time both seem plausible. Tempo and sync details.
5. Keep a manual way to change the look
Adjusting a manual value while its audio response is enabled can place that parameter in Held state. Choose Enabled again to resume the response. Use this when you want a steady look for a moment without losing the saved binding.
You can apply the same animation workflow to supported numeric effect parameters and Animate Opacity in a clip's Transform controls. This makes audio response useful for your own video as well as generated sources.
6. Save the variation
Use Looks → Save look… to save a .uvjshader preset containing the shader controls and animation settings. Save the .uvj set too when you want to keep the surrounding clips, layers, output and show configuration.
Reopen the look or set and check the intended input device before using it. A stored device choice is separate from a connected, permission-granted input.
Audio playback and recording
Enable file audio is a separate control for movie soundtracks and audio-only clips. Leave it off when another application supplies the music. File-audio speed changes pitch as well as tempo; the visual audio-response controls do not turn it into a pitch-preserving audio player.
Ultimate VJ records silent video. If you record a visual take, expect a H.264 .mov with no audio track. File audio · Recording.
If the image is not responding
Check the input level and device first. Then check the chosen band, Enabled state, Amount and Held state. Use one parameter with an obvious visible range to isolate the problem. A silent or unavailable input, a zero Amount and a held parameter need different fixes.
For further help, keep the app version, input-device name and steps you tried, then ask on Discord. Return to the feature guide.